The Raspberry Pi has always been a capable little computer, and with the Raspberry Pi 4 series, we now have Wifi, Bluetooth etc along with 8 Gb RAM – a perfect little machine to create a test bed on.
For this project, I went with the below configuration
- 3x Raspberry Pi 4B with 8gb RAM each
- 3x Raspberry Pi official power supply
- 3x Raspberry Pi case
- One Raspberry Pi mini HDMI to HDMI official cable
- Three micro SD cards – Samsung Class 10
Part 1 – The Hardware
I am leaving the Amazon links for the items below in case you need the exact make/models I used
Raspberry Pi 4B 8gb – while a 4gb model works fine, an 8gb gives you more flexibility when it comes to creating some of the more fun stuff with the Pi
Raspberry Pi Model 4 B (with Wifi and Bluetooth) 8 GB RAMWhile an easier option is to use a PoE hat and a PoE switch, I went for the flexibility of the Raspberry USB power supplies
Raspberry Pi USB-C official power supply for Raspberry PI 4, 3, 4B, 3BWhile the Pi can be used as is, a case helps – I have one Pi (older) with the aluminum case
Raspberry Pi Metal Aluminum Case with Double Fans for Raspberry Pi 4BThis is the preferred case I chose – which came with it’s own heat sink and FAN
Raspberry Pi model 4B acrylic case with heat sink and FANStorage is important. The faster and more reliable it is, the better. Keeping cost and performance in mind, I went with the Samsung micro SD cards which offer great storage value at a reasonable cost
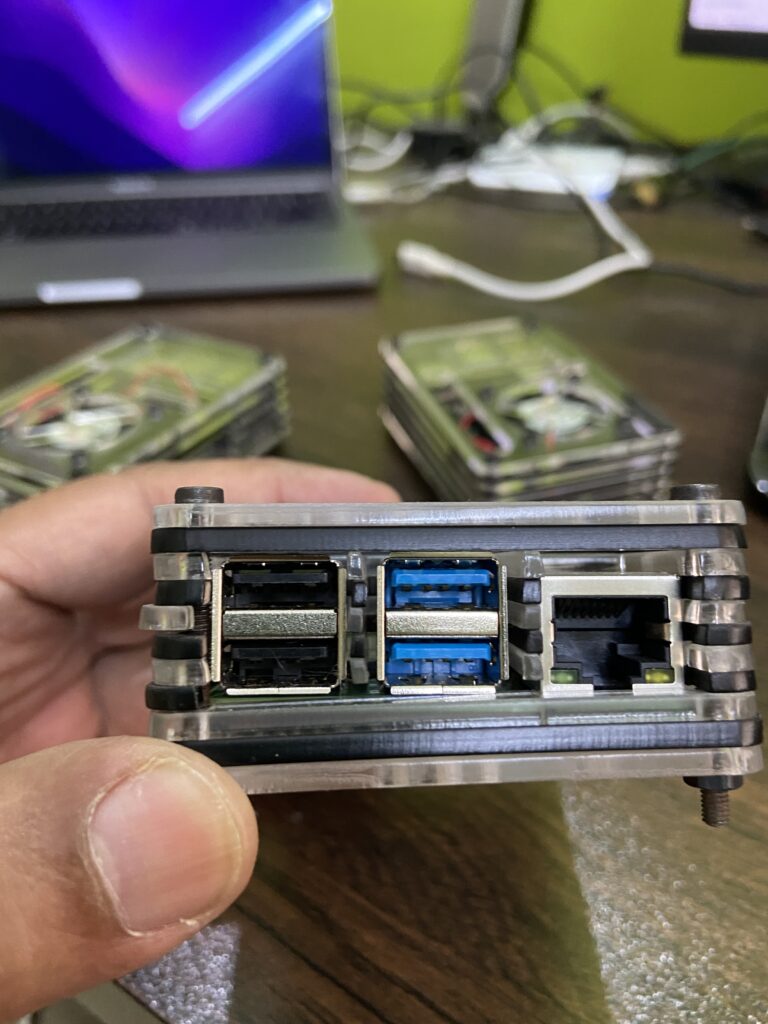
SAMSUNG 128gb micro SD card – Class 10The Raspberry Pi has the following ports (might vary depending on your model 2/3/4 model B etc)
- Power – either Micro USB (pre Raspberry 3) or USB-C
- 2x mini HDMI supporting dual 4k monitors (sweet) 🙂
- One headphone jack
- 4x USB-A
- One RJ45


Part 2: The Installation
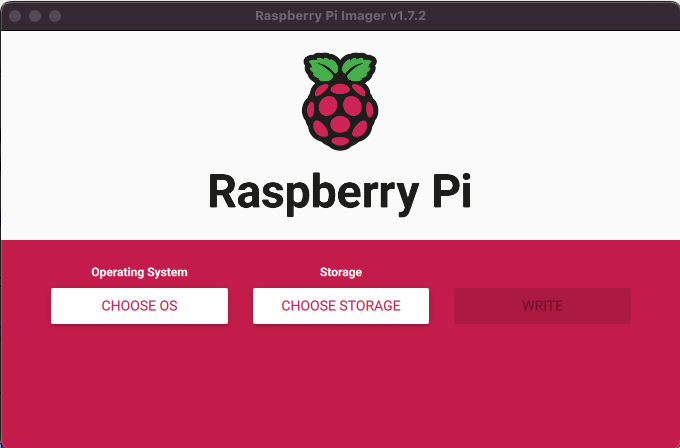
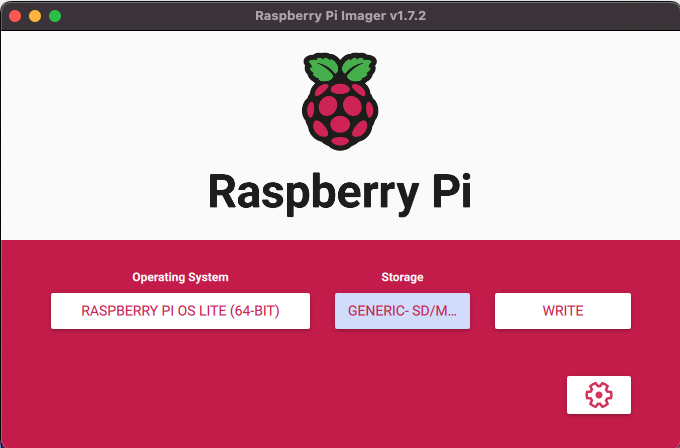
As with any other hardware, the Pi needs an OS and some basic configuration for it to function. The easiest way to get an OS is to just use the Raspberry Pi Imager from here
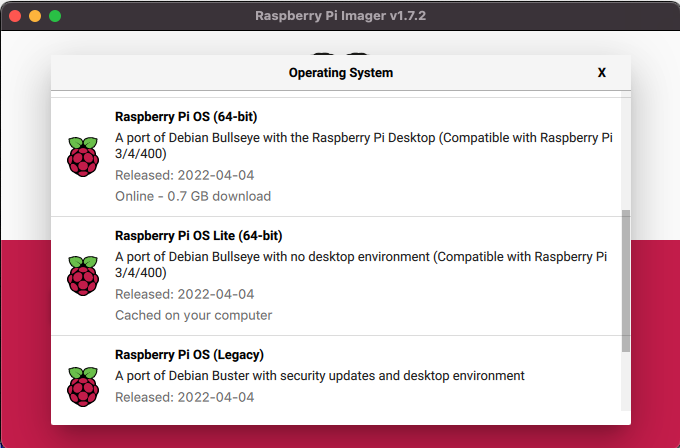
The imager needs to be installed on your local machine that has a SD/Micro SD card slot and then the Imager can be used to download and push the images to the SD Card. While there are a bunch of images to choose from, since we are limited in terms of resources, a 64bit Raspberry Pi OS – Lite works just fine.
For the installation, place the MicroSD card in the adapter/laptop and fire up Raspberry Pi Imager

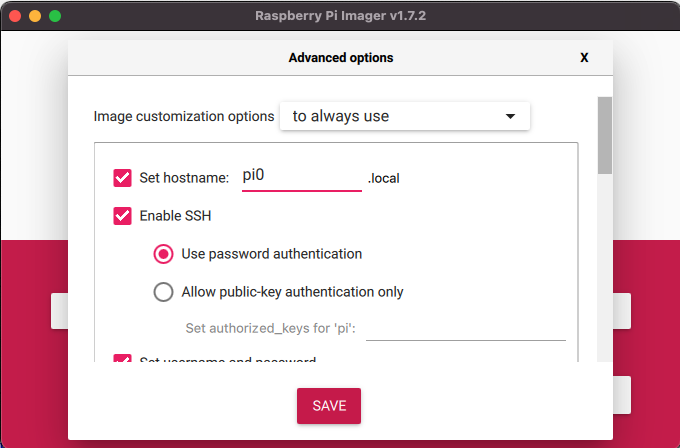
The Advanced Options (Gear ICON) can be used to set up the below defaults
- Set the device hostname (device name needs to have a .local extension – you will see why below)
- Enable SSH server (so we can SSH into the machine without needing a monitor)
- Username and Password (mandatory for Raspberry Pi 4 and above)
- Configure Wireless LAN (Important 🙂 – remember you will need the SSID and the password)
- Set Locale (Again, important for the device to get the correct local time and keyboard layout etc)
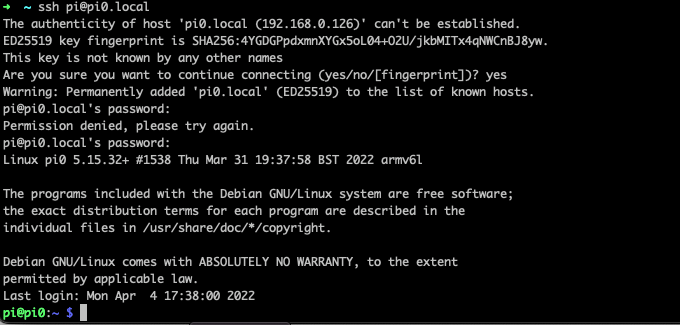
Should the installation have gone through fine, the device will reboot a couple of times. After the device has come back up post reboot, you should be able to ping the device with the hostname and the .local extension 🙂
Note: if you are unable to ping the device(s) then connect the Raspberry Pi to a monitor and attach a USB keyboard and mouse and ensure that the Wifi/LAN is set up correctly. You can use the “raspi-config” command with sudo to confirm the settings post install – but then, mostly should the installation have gone through successfully, the device should be on the network at this point. Again, this will ONLY work if you are connected to the same network you are trying to ping and IPv6 etc is enabled

At this point, though we are logged in, we need to make a couple of changes
- Check the hostname and User that was set up and confirm the ser, hostname, time, date and locale are correct
- Change the IP address from DHCP to static (makes the environment more predictable and manageable)
So log in to the machine using the username and password that was set during installation and change the /etc/dhcpc.conf
So do a sudo nano /etc/dhcpcd.conf
Change the section that begins with: “# Example static IP configuration:”
# Example static IP configuration:
#interface eth0
#static ip_address=192.168.0.2/24
#static ip6_address=fd51:42f8:caae:d92e::ff/64
#static routers=192.168.0.1
#static domain_name_servers=192.168.0.1 8.8.8.8 fd51:42f8:caae:d92e::1
For making the changes, uncomment (remove the #) in front of the settings and make changes. Should you be using Wifi and your device be Wifi0 (check with #ip addr) make changes accordingly. My configuration looks like below
# Example static IP configuration:
interface eth0 <----- adpater (choose between ethx and wifix)
static ip_address=192.168.0.200/24 <----- (IP Range)
#static ip6_address=fd51:42f8:caae:d92e::ff/64
static routers=192.168.0.1 <--- Default GW
static domain_name_servers=192.168.0.1 8.8.8.8 fd51:42f8:caae:d92e::1 <-- DNS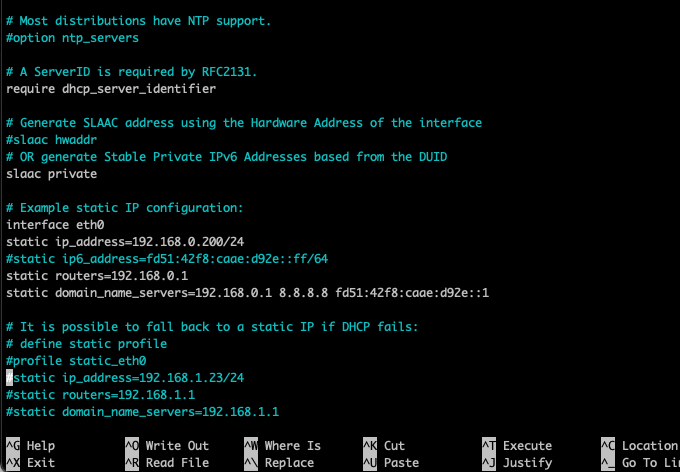
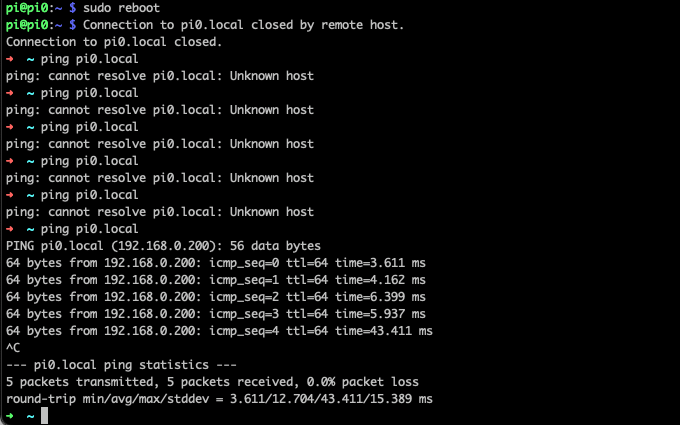
Save the config and reboot. Post reboot, you should ideally see ping to hostname.local ping back with the new static IP Address that was set
At this point, you should be able to log in to the machine with either the new IP or the FQDN (ending with .local)
At this point, apt can be used to update the Pi’s to the latest patch levels
sudo apt update -y && sudo apt upgrade -y
Part 3 – The configuration
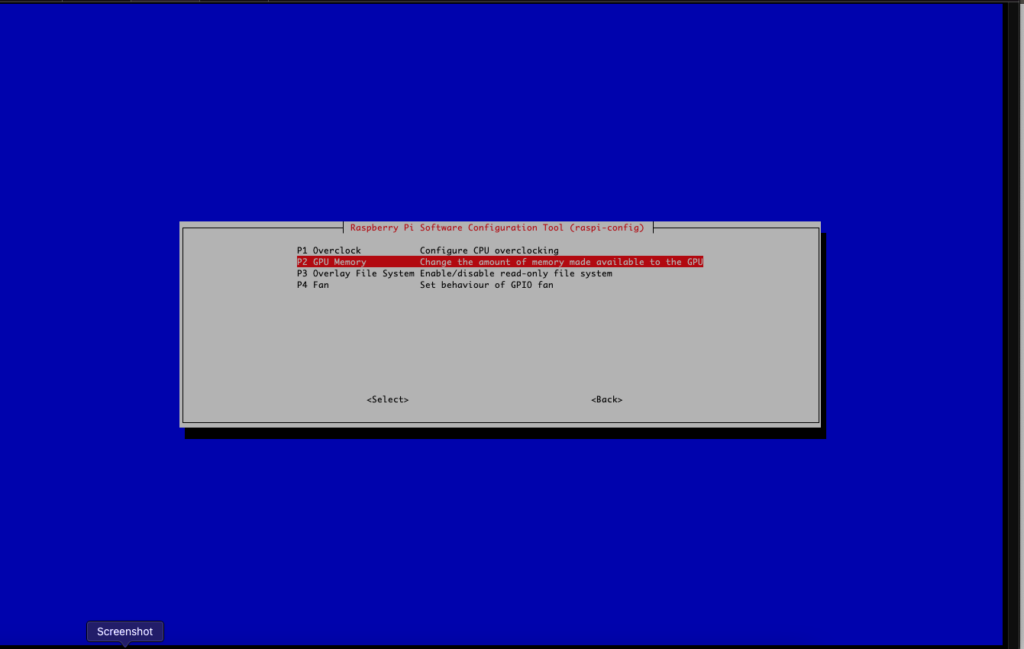
By default Raspberry Pi OS default to 64mb memory for the GUI even if the install is a headless installation. We will need to reclaim some memory so we can use the memory while deploying microservices on the Kubernetes Cluster later on 🙂
To change the default memory, log into each Raspberry Pi and run the #sudo raspi-config command which should bring up the config page for the Pi
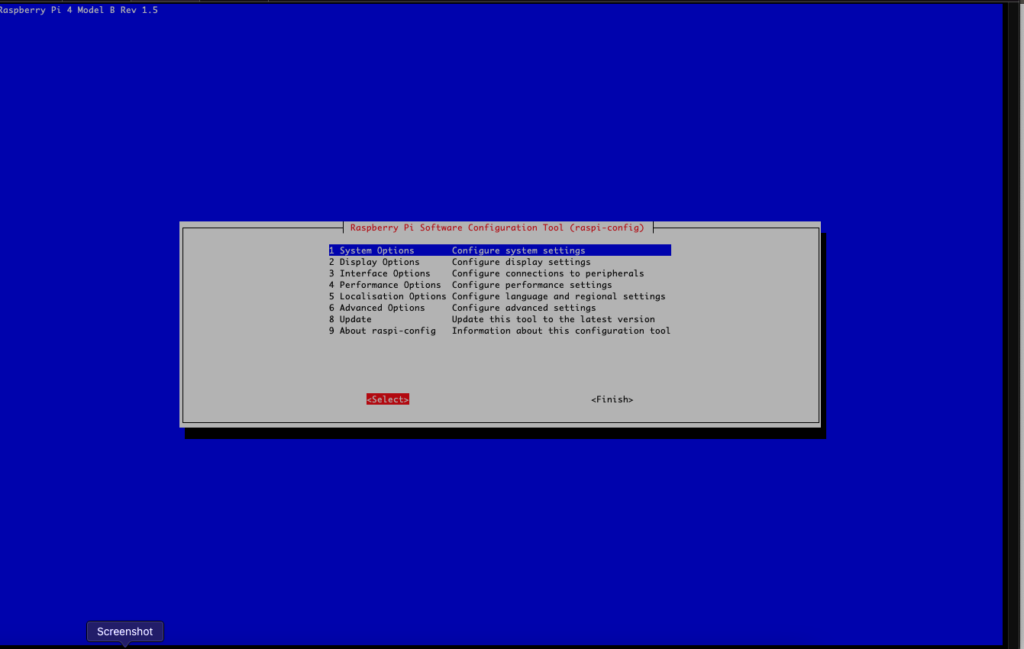
Scroll down to Performance Options and change the Graphics memory to 1MB and save the settings and reboot
Post reboot you can cat the /boot/config file to check the memory assigned
pi@pi1:~ $ cat /boot/config.txt | grep -i gpu
gpu_mem=1 <------- NICE :-)
Note: This can also be done by just #sudo nano /etc/config.txt and adding the below at the end of the file followed by a reboot
[all]
gpu_mem=1
Once that is done, we need to enable container features on the Raspberry Pis. That, just #sudo nano /boot/cmdline.txt and add the below at the end of the boot string
cgroup_enable=cpuset cgroup_memory=1 cgroup_enable=memorySo the file should look something like this

This needs to be done to all three Raspberry Pis. Once the changes are done, reboot 🙂
To check if cgroups are enabled/mounted, just cat the /proc/cgroups and check
Before
$ cat /proc/cgroups
#subsys_name	hierarchy	num_cgroups	enabled
cpuset	0	77	1
cpu	0	77	1
cpuacct	0	77	1
blkio	0	77	1
memory	0	77	0
devices	0	77	1
freezer	0	77	1
net_cls	0	77	1
perf_event	0	77	1
net_prio	0	77	1
pids	0	77	1
After
$ cat /proc/cgroups
#subsys_name	hierarchy	num_cgroups	enabled
cpuset	0	71	1
cpu	0	71	1
cpuacct	0	71	1
blkio	0	71	1
memory	0	71	1
devices	0	71	1
freezer	0	71	1
net_cls	0	71	1
perf_event	0	71	1
net_prio	0	71	1
pids	0	71	1
In my case, I had to force a firmware upgrade for this to work using #rpi-update
Before #rpi-update
#cat /sys/firmware/devicetree/base/model
Raspberry Pi 4 Model B Rev 1.5

#uname -a
Linux pi1 5.15.32-v8+ #1538 SMP PREEMPT Thu Mar 31 19:40:39 BST 2022 aarch64 GNU/Linux


#sudo rpi-update <---------
 *** Raspberry Pi firmware updater by Hexxeh, enhanced by AndrewS and Dom
 *** Performing self-update
 *** Relaunching after update
 *** Raspberry Pi firmware updater by Hexxeh, enhanced by AndrewS and Dom
 *** We're running for the first time
 *** Backing up files (this will take a few minutes)
 *** Backing up firmware
 *** Backing up modules 5.15.32-v8+
#############################################################
WARNING: This update bumps to rpi-5.15.y linux tree
See: https://forums.raspberrypi.com/viewtopic.php?t=322879

'rpi-update' should only be used if there is a specific
reason to do so - for example, a request by a Raspberry Pi
engineer or if you want to help the testing effort
and are comfortable with restoring if there are regressions.

DO NOT use 'rpi-update' as part of a regular update process.
##############################################################
Would you like to proceed? (y/N)

 *** Downloading specific firmware revision (this will take a few minutes)
  % Total    % Received % Xferd  Average Speed   Time    Time     Time  Current
                                 Dload  Upload   Total   Spent    Left  Speed
  0     0    0     0    0     0      0      0 --:--:-- --:--:-- --:--:--     0
100  111M    0  111M    0     0  3594k      0 --:--:--  0:00:31 --:--:-- 3879k
After update
#cat /sys/firmware/devicetree/base/model
Raspberry Pi 4 Model B Rev 1.5

#uname -a
Linux pi1 5.15.40-v8+ #1556 SMP PREEMPT Wed May 18 11:30:14 BST 2022 aarch64 GNU/Linux
Part 4 – k3s/Kubernetes 🙂
As this is a Raspberry Pi Kubernetes/k8s/k3s cluster, we will be using the k3s distribution of Kubernetes by Rancher Labs
So, question – what exactly is K3s? 🙂 Glad you asked. K3s is a lightweight “The certified Kubernetes distribution built for IoT & Edge computing” maintained by Rancher Labs and is CNCF/Cloud Native Computing Foundation sandbox project 🙂
So the version of Kubernetes actually includes all the components of a full blown Kubernetes cluster in a smaller footprint! What’s not to like!
The install process is pretty straightforward. We will be bootstrapping one of the nodes as the Kubernetes master and will be adding the two other nodes as slaves. To start the installation, I am going to my master node (conveniently named pi1) and running the below command
curl -sfL https://get.k3s.io | sh -Installation takes less than a minute
pi@pi1:~ $ curl -sfL https://get.k3s.io | sh -
[INFO]  Finding release for channel stable
[INFO]  Using v1.23.6+k3s1 as release
[INFO]  Downloading hash https://github.com/k3s-io/k3s/releases/download/v1.23.6+k3s1/sha256sum-arm64.txt
[INFO]  Downloading binary https://github.com/k3s-io/k3s/releases/download/v1.23.6+k3s1/k3s-arm64
[INFO]  Verifying binary download
[INFO]  Installing k3s to /usr/local/bin/k3s
[INFO]  Skipping installation of SELinux RPM
[INFO]  Creating /usr/local/bin/kubectl symlink to k3s
[INFO]  Creating /usr/local/bin/crictl symlink to k3s
[INFO]  Creating /usr/local/bin/ctr symlink to k3s
[INFO]  Creating killall script /usr/local/bin/k3s-killall.sh
[INFO]  Creating uninstall script /usr/local/bin/k3s-uninstall.sh
[INFO]  env: Creating environment file /etc/systemd/system/k3s.service.env
[INFO]  systemd: Creating service file /etc/systemd/system/k3s.service
[INFO]  systemd: Enabling k3s unit
Created symlink /etc/systemd/system/multi-user.target.wants/k3s.service → /etc/systemd/system/k3s.service.
[INFO]  systemd: Starting k3s
pi@pi1:~ $
We can check if the service has started as below using the systemclt command:
#sudo systemctl status k3spi@pi1:~ $ sudo systemctl status k3s
● k3s.service - Lightweight Kubernetes
Loaded: loaded (/etc/systemd/system/k3s.service; enabled; vendor preset: enabled)
Active: active (running) since Sun 2022-05-22 16:40:14 IST; 58s ago
Docs: https://k3s.io
Process: 1347 ExecStartPre=/bin/sh -xc ! /usr/bin/systemctl is-enabled --quiet nm-cloud-setup.service (code=exited, status=0/SUCCESS)
Process: 1349 ExecStartPre=/sbin/modprobe br_netfilter (code=exited, status=0/SUCCESS)
Process: 1352 ExecStartPre=/sbin/modprobe overlay (code=exited, status=0/SUCCESS)
Main PID: 1353 (k3s-server)
Tasks: 76
Memory: 561.1M
CPU: 54.362s
CGroup: /system.slice/k3s.service
├─1353 /usr/local/bin/k3s server
├─1440 containerd -c /var/lib/rancher/k3s/agent/etc/containerd/config.toml -a /run/k3s/containerd/containerd.sock --state /run/k3s/containerd --root /var/lib/rancher/k3s/agen>
└─1879 /var/lib/rancher/k3s/data/33f2f883e918543e89bba65177eafb6148f9fa38c07c61cf7ce6ae61c0f50a96/bin/unpigz -d -c
May 22 16:40:46 pi1 k3s[1353]: I0522 16:40:46.158133 1353 iptables.go:243] Adding iptables rule: -s 10.42.0.0/16 ! -d 224.0.0.0/4 -m comment --comment flanneld masq -j MASQUERADE --ran>
May 22 16:40:46 pi1 k3s[1353]: I0522 16:40:46.179741 1353 iptables.go:243] Adding iptables rule: ! -s 10.42.0.0/16 -d 10.42.0.0/24 -m comment --comment flanneld masq -j RETURN
May 22 16:40:46 pi1 k3s[1353]: I0522 16:40:46.191255 1353 iptables.go:243] Adding iptables rule: ! -s 10.42.0.0/16 -d 10.42.0.0/16 -m comment --comment flanneld masq -j MASQUERADE --ra>
May 22 16:40:46 pi1 k3s[1353]: E0522 16:40:46.194317 1353 dns.go:157] "Nameserver limits exceeded" err="Nameserver limits were exceeded, some nameservers have been omitted, the applied>
May 22 16:40:47 pi1 k3s[1353]: I0522 16:40:47.727166 1353 trace.go:205] Trace[1838729628]: "GuaranteedUpdate etcd3" type:*core.Pod (22-May-2022 16:40:46.804) (total time: 922ms):
May 22 16:40:47 pi1 k3s[1353]: Trace[1838729628]: ---"Transaction committed" 916ms (16:40:47.726)
May 22 16:40:47 pi1 k3s[1353]: Trace[1838729628]: [922.71157ms] [922.71157ms] END
May 22 16:40:47 pi1 k3s[1353]: I0522 16:40:47.728723 1353 trace.go:205] Trace[611986443]: "Patch" url:/api/v1/namespaces/kube-system/pods/local-path-provisioner-6c79684f77-xpzqm/status>
May 22 16:40:47 pi1 k3s[1353]: Trace[611986443]: ---"Object stored in database" 919ms (16:40:47.728)
May 22 16:40:47 pi1 k3s[1353]: Trace[611986443]: [924.598366ms] [924.598366ms] END
May 22 16:41:14 pi1 k3s[1353]: E0522 16:41:14.487346 1353 resource_quota_controller.go:413] unable to retrieve the complete list of server APIs: metrics.k8s.io/v1beta1: the server is c>
lines 1-27/27 (END)For the next bit, we will need to install k3s on the other two nodes and have them added to the master node. For this, we will be using the master-node token and passing them to the slaves during installation
$ sudo cat /var/lib/rancher/k3s/server/node-token
K10aa34cfda89522609649b3cf859718b71399c1d3c21276f6f94d1a2f68e8c0290::server:0e527826bc96572bf60bc38bb43ba633
Now we will use the key above to add in the two other nodes. While this can be done manually, there is an automated way to add nodes as well. So let’s try both methods one node at a time
Method 1 – manual install by downloading the binary
For this, we will be exporting the TOKEN from the master node and will be downloading and installing the binary and then adding the node to the cluster.
Step 1 – get the TOKEN of the master node
export TOKEN=`ssh -t pi@pi1.local sudo cat /var/lib/rancher/k3s/server/node-token`Note – change the hostname of the master per your set up. This command will give the output as below
$ export TOKEN=`ssh -t pi@pi1.local sudo cat /var/lib/rancher/k3s/server/node-token`
The authenticity of host 'pi1.local (192.168.0.111)' can't be established.
ECDSA key fingerprint is SHA256:0QeC/irVkxcajIiUvgz2yEoHsbEOYKAkIc4nybLP4Ew.
Are you sure you want to continue connecting (yes/no/[fingerprint])? yes
Warning: Permanently added 'pi1.local,192.168.0.111' (ECDSA) to the list of known hosts.
pi@pi1.local's password:
Connection to pi1.local closed.
Then download and use the TOKEN to add the node to the cluster with the below command
curl -sfL https://get.k3s.io | K3S_URL=https://192.168.0.111:6443 K3S_TOKEN=$TOKEN sh -Note: Change the IP to the master IP of your set up
Successful installation should show the below output
pi@pi2:~ $ curl -sfL https://get.k3s.io | K3S_URL=https://192.168.0.111:6443 K3S_TOKEN=$TOKEN sh -
[INFO]  Finding release for channel stable
[INFO]  Using v1.23.6+k3s1 as release
[INFO]  Downloading hash https://github.com/k3s-io/k3s/releases/download/v1.23.6+k3s1/sha256sum-arm64.txt
[INFO]  Downloading binary https://github.com/k3s-io/k3s/releases/download/v1.23.6+k3s1/k3s-arm64
[INFO]  Verifying binary download
[INFO]  Installing k3s to /usr/local/bin/k3s
[INFO]  Skipping installation of SELinux RPM
[INFO]  Creating /usr/local/bin/kubectl symlink to k3s
[INFO]  Creating /usr/local/bin/crictl symlink to k3s
[INFO]  Creating /usr/local/bin/ctr symlink to k3s
[INFO]  Creating killall script /usr/local/bin/k3s-killall.sh
[INFO]  Creating uninstall script /usr/local/bin/k3s-agent-uninstall.sh
[INFO]  env: Creating environment file /etc/systemd/system/k3s-agent.service.env
[INFO]  systemd: Creating service file /etc/systemd/system/k3s-agent.service
[INFO]  systemd: Enabling k3s-agent unit
Created symlink /etc/systemd/system/multi-user.target.wants/k3s-agent.service → /etc/systemd/system/k3s-agent.service.
[INFO]  systemd: Starting k3s-agent
Service status can be checked by running the #sudo systemctl status k3s-agent command
pi@pi2:~ $ sudo systemctl status k3s-agent
● k3s-agent.service - Lightweight Kubernetes
     Loaded: loaded (/etc/systemd/system/k3s-agent.service; enabled; vendor preset: enabled)
     Active: active (running) since Sun 2022-05-22 17:04:16 IST; 8min ago
       Docs: https://k3s.io
    Process: 1467 ExecStartPre=/bin/sh -xc ! /usr/bin/systemctl is-enabled --quiet nm-cloud-setup.service (code=exited, status=0/SUCCESS)
    Process: 1469 ExecStartPre=/sbin/modprobe br_netfilter (code=exited, status=0/SUCCESS)
    Process: 1472 ExecStartPre=/sbin/modprobe overlay (code=exited, status=0/SUCCESS)
   Main PID: 1473 (k3s-agent)
      Tasks: 9
     Memory: 238.4M
        CPU: 15.252s
     CGroup: /system.slice/k3s-agent.service
             └─1473 /usr/local/bin/k3s agent
Method 2 – using Ketchup 🙂 k3sup
k3sup actually automates most of the work for a Kubernetes install. To install it, run the below command from the third Raspberry Pi
curl -sLS https://get.k3sup.dev | shThis command will automatically check the hardware version and download the binary. On my Raspberry set up as a non – root user, it asks for the binary to be manually moved post download
curl -sLS https://get.k3sup.dev | sh
aarch64 <-----------
Downloading package https://github.com/alexellis/k3sup/releases/download/0.11.3/k3sup-arm64 as /home/pi/k3sup-arm64
Download complete.

============================================================
  The script was run as a user who is unable to write
  to /usr/local/bin. To complete the installation the
  following commands may need to be run manually.
============================================================

  sudo cp k3sup-arm64 /usr/local/bin/k3sup <-----------


================================================================
  Thanks for choosing k3sup.
  Support the project through GitHub Sponsors

  https://github.com/sponsors/alexellis
================================================================
Post moving the binary to /usr/local/bin/k3sup, we can launch it – which should work if the install was successful
pi@pi3:~ $ sudo cp k3sup-arm64 /usr/local/bin/k3sup
pi@pi3:~ $ k3sup
 _    _____
| | _|___ / ___ _   _ _ __
| |/ / |_ \/ __| | | | '_ \
|   < ___) \__ \ |_| | |_) |
|_|\_\____/|___/\__,_| .__/
                     |_|
Usage:
  k3sup [flags]
  k3sup [command]

Available Commands:
  help        Help about any command
  install     Install k3s on a server via SSH
  join        Install the k3s agent on a remote host and join it to an existing server
  update      Print update instructions
  version     Print the version

Flags:
  -h, --help   help for k3sup

Use "k3sup [command] --help" for more information about a command.
Post that, we can use a single command to deploy our worker node
#k3sup install --ip 192.168.0.111 --user piNote: if you get an SSH error, check if the server has the SSH keys generated
Error: unable to load the ssh key with path "/home/pi/.ssh/id_rsa": unable to read file: /home/pi/.ssh/id_rsa, open /home/pi/.ssh/id_rsa: no such file or directoryTo get rid of this error, on the server/master, just generate the keys with #ssh-keygen
$ ssh-keygen
Generating public/private rsa key pair.
Enter file in which to save the key (/home/pi/.ssh/id_rsa):
Created directory '/home/pi/.ssh'.
Enter passphrase (empty for no passphrase):
Enter same passphrase again:
Your identification has been saved in /home/pi/.ssh/id_rsa
Your public key has been saved in /home/pi/.ssh/id_rsa.pub
The key fingerprint is:
SHA256:V/0QSHMvJz2tq/LW8dQrNXWw6bBV2fI2HC/v3SkgCRY pi@pi1
The key's randomart image is:
+---[RSA 3072]----+
|           .o.o o|
|       E    .+o*+|
|        .   . *OB|
|       o   .. =XB|
|      . S o  =.+*|
|         + .. o++|
|          . ..o=*|
|          . .+.o=|
|           +o o  |
+----[SHA256]-----+
pi@pi1:~ $
Then reattempt
If you see a “/usr/bin/ssh-copy-id: ERROR: No identities found” then
- run the below on the master
#evalssh-agent
#ssh-add - on the client (slave) run
#ssh-keygen - Then retry. It should give the below if successful
$ ssh-copy-id -i /home/pi/.ssh/id_rsa.pub 192.168.0.111
/usr/bin/ssh-copy-id: INFO: Source of key(s) to be installed: "/home/pi/.ssh/id_rsa.pub"
The authenticity of host '192.168.0.111 (192.168.0.111)' can't be established.
ECDSA key fingerprint is SHA256:0QeC/irVkxcajIiUvgz2yEoHsbEOYKAkIc4nybLP4Ew.
Are you sure you want to continue connecting (yes/no/[fingerprint])? yes
/usr/bin/ssh-copy-id: INFO: attempting to log in with the new key(s), to filter out any that are already installed
/usr/bin/ssh-copy-id: INFO: 1 key(s) remain to be installed -- if you are prompted now it is to install the new keys
pi@192.168.0.111's password:

Number of key(s) added: 1

Now try logging into the machine, with:   "ssh '192.168.0.111'"
and check to make sure that only the key(s) you wanted were added.
A successful install will look like this
$ k3sup install --ip 192.168.0.111 --user pi
Running: k3sup install
2022/05/22 18:35:07 192.168.0.111
Public IP: 192.168.0.111
[INFO]  Finding release for channel stable
[INFO]  Using v1.23.6+k3s1 as release
[INFO]  Downloading hash https://github.com/k3s-io/k3s/releases/download/v1.23.6+k3s1/sha256sum-arm64.txt
[INFO]  Skipping binary downloaded, installed k3s matches hash
[INFO]  Skipping installation of SELinux RPM
[INFO]  Skipping /usr/local/bin/kubectl symlink to k3s, already exists
[INFO]  Skipping /usr/local/bin/crictl symlink to k3s, already exists
[INFO]  Skipping /usr/local/bin/ctr symlink to k3s, already exists
[INFO]  Creating killall script /usr/local/bin/k3s-killall.sh
[INFO]  Creating uninstall script /usr/local/bin/k3s-uninstall.sh
[INFO]  env: Creating environment file /etc/systemd/system/k3s.service.env
[INFO]  systemd: Creating service file /etc/systemd/system/k3s.service
[INFO]  systemd: Enabling k3s unit
Created symlink /etc/systemd/system/multi-user.target.wants/k3s.service → /etc/systemd/system/k3s.service.
[INFO]  systemd: Starting k3s
Result: [INFO]  Finding release for channel stable
[INFO]  Using v1.23.6+k3s1 as release
[INFO]  Downloading hash https://github.com/k3s-io/k3s/releases/download/v1.23.6+k3s1/sha256sum-arm64.txt
[INFO]  Skipping binary downloaded, installed k3s matches hash
[INFO]  Skipping installation of SELinux RPM
[INFO]  Skipping /usr/local/bin/kubectl symlink to k3s, already exists
[INFO]  Skipping /usr/local/bin/crictl symlink to k3s, already exists
[INFO]  Skipping /usr/local/bin/ctr symlink to k3s, already exists
[INFO]  Creating killall script /usr/local/bin/k3s-killall.sh
[INFO]  Creating uninstall script /usr/local/bin/k3s-uninstall.sh
[INFO]  env: Creating environment file /etc/systemd/system/k3s.service.env
[INFO]  systemd: Creating service file /etc/systemd/system/k3s.service
[INFO]  systemd: Enabling k3s unit
[INFO]  systemd: Starting k3s
 Created symlink /etc/systemd/system/multi-user.target.wants/k3s.service → /etc/systemd/system/k3s.service.

Saving file to: /home/pi/kubeconfig

# Test your cluster with:
export KUBECONFIG=/home/pi/kubeconfig
kubectl config set-context default
kubectl get node -o wide
To add the node to the cluster just use the below command
k3sup join --ip 192.168.0.113 --server-ip 192.168.0.111 --user pi --server-user piAt this point, should everything have gone through fine, a “#sudo kubectl get node -o wide” should show the node details
$ sudo kubectl get node -o wide
NAME   STATUS   ROLES                  AGE     VERSION        INTERNAL-IP     EXTERNAL-IP   OS-IMAGE                         KERNEL-VERSION   CONTAINER-RUNTIME
pi3    Ready    <none>                 3m16s   v1.23.6+k3s1   192.168.0.113   <none>        Debian GNU/Linux 11 (bullseye)   5.15.32-v8+      containerd://1.5.11-k3s2
pi1    Ready    control-plane,master   3h28m   v1.23.6+k3s1   192.168.0.111   <none>        Debian GNU/Linux 11 (bullseye)   5.15.32-v8+      containerd://1.5.11-k3s2
pi2    Ready    <none>                 58s     v1.23.6+k3s1   192.168.0.112   <none>        Debian GNU/Linux 11 (bullseye)   5.15.32-v8+      containerd://1.5.11-k3s2
So at this point, I have three nodes set up 111 (master) and two workers (112 and 113)